

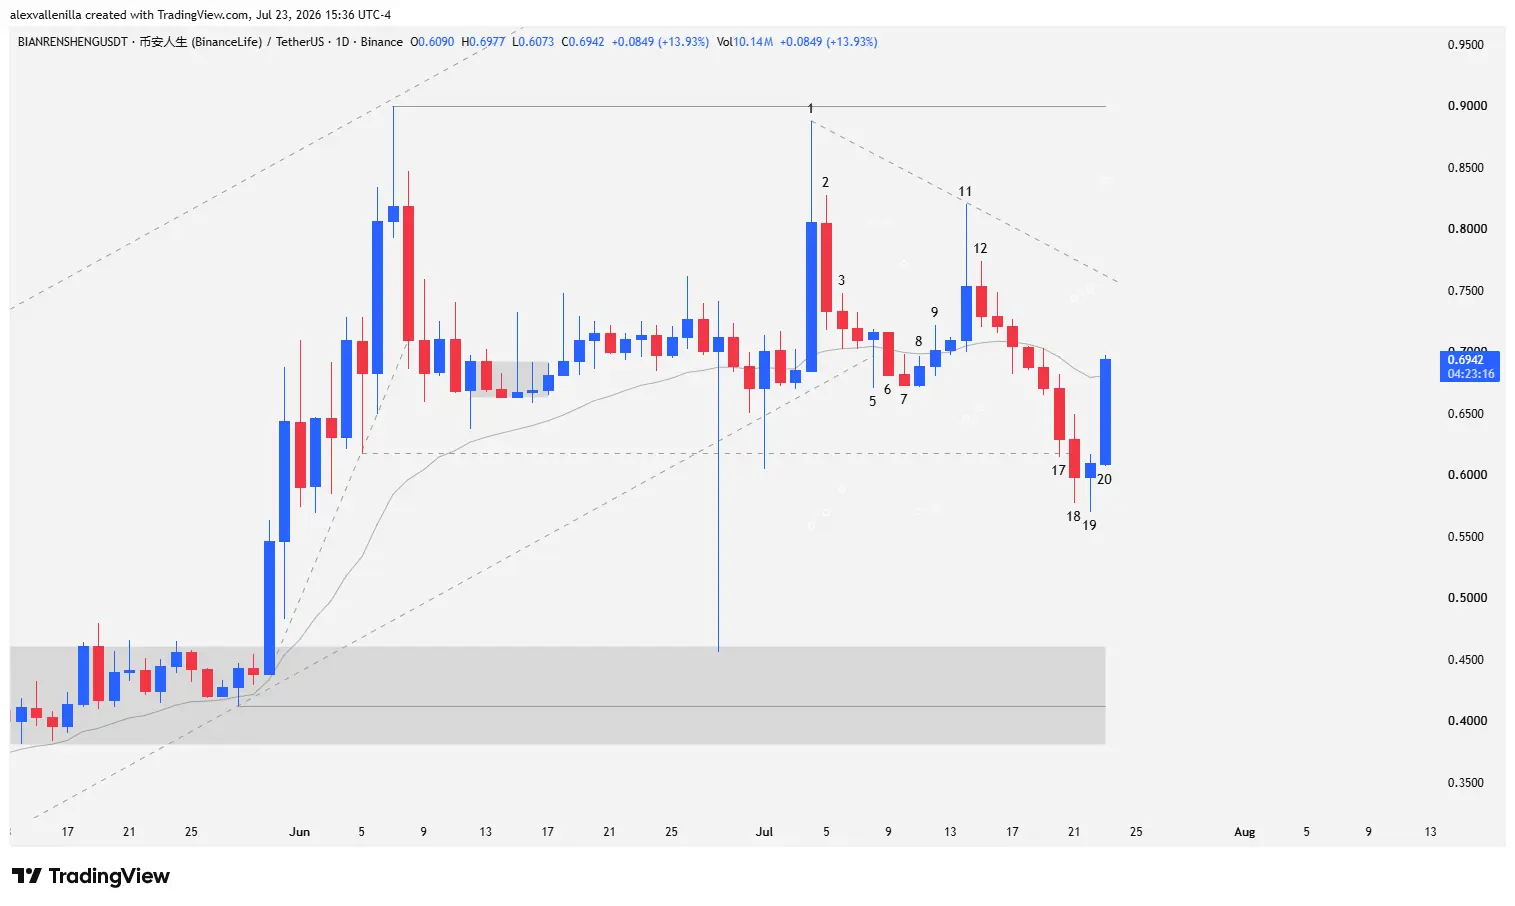
During the last 20 sessions on the spot market daily chart, the BIANRENSHENG (币安人生) cryptocurrency features an intense battle between buyers and sellers. After breaking below the 89-bar trendline and posting a bearish climax down to $0.6180, the asset accumulates a 509.75% return over the past 12 months, forcing investors to reassess the sustainability of its macro bull structure.
Resistance Pressure and Initial Rejection
Bar 1 shatters a prior trading range through a strong bullish impulse, though buyers fail when trying to test the psychological resistance at $0.8999. A prominent upper tail shows how sellers defend the ceiling by absorbing demand. Bar 2 halts the bullish momentum via an inside bar pattern, giving way to a compression phase in Bars 3 and 4, which develop with overlapping bodies and above the 20-period exponential moving average (20 EMA).
Structural Break and Accelerated Sell-Off
The scenario changes when Bar 5, configured as a pin bar, tries to bounce without success. Bar 6 definitively breaks the 89-bar bull trendline, establishing the first serious threat of a structural shift. Although Bar 7 shows selling weakness, the price yields ground and triggers an accelerated drop that culminates in Bar 17, slightly piercing local support at $0.6180.
Selling pressure continues on Bar 18, which challenges the zone on its way toward the structural support at $0.4122. However, the appearance of a wide lower tail signals the presence of institutional buy orders absorbing supply at the lows.
Price Action: Bullish Reversal and Bear Trap
Bar 19 acts as an inverted hammer that abruptly halts the downside progress, setting the stage for Bar 20.
This twentieth bar prints a solid bullish marubozu pattern with no relevant wicks, closing above the 20 EMA and trapping lagging sellers from Bars 16, 17, and 18. From a price action perspective, the combination of Bar 19 and Bar 20 functions as a classic bear trap or EMA gap bar, suggesting that the recent drop operates as a minor correction within a still-valid macro uptrend, provided that the $0.4122 support holds intact.
BIANRENSHENG‘s price behavior demonstrates that digital markets reward precise order flow reading over market noise. Monitoring the price reaction to the current micro-bear channel defines the capacity of the bulls to regain operational control.
Disclaimer: This article is for educational and informational purposes only. It does not constitute financial or investment advice. Cryptocurrency trading carries high risks of capital loss; conduct your own research before trading.

Communications Professional. Crypto Enthusiast. Economic Journalist. Bitcoiner & Altcoiner.


