Jupiter (JUP), the native token of Solana’s premier DeFi aggregator, is staging a robust structural recovery on the daily (1D) chart, consolidating a new short-term bullish bias within a 21-bar channel. After validating critical institutional support zones and shaking off pressure from a previous bearish microchannel, the cryptocurrency has accumulated a 22.09% year-to-date return in 2026 and a remarkable 48.04% gain over the past quarter. The current move looks to break through key congestion zones to permanently invalidate the year-over-year bearish dominance holding the asset back, where it still records a 50.13% loss.

Resilience at the Heart of Solana
The decentralized finance (DeFi) market is witnessing a massive liquidity transfer toward Jupiter‘s most stable technical support levels. Order flow dynamics demonstrate that buyers are systematically absorbing excess supply at the bottom of the structure, invalidating the continuity of the macro markdown phase that previously dominated the chart across 259 bars.
The bears’ inability to pierce year-to-date lows reflects a clear loss of momentum from sellers. This technical backdrop opens the door for a markup phase, where institutional and retail participants are executing a solid defensive positioning along key moving averages, setting the stage for a direct assault on medium-term psychological and technical resistance zones.
Exclusive Technical Analysis: Strict Price Action Reading
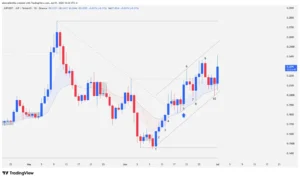
Order flow narrative on the JUP daily chart reveals a drastic shift in trader psychology through a breakdown of its key bars:
Bar 1: Bulls execute a bear trap by trapping previous-session sellers who were attempting to break a congestion pattern to the downside. The low prints firmly above key support at $0.1457, snapping a 7-bar bearish microchannel characterized by lower highs. Crucially, the session prior to Bar 1 also failed to pierce the $0.1350 line in the sand—a highly significant structural level from the previous 259-bar downtrend that has remained unbroken for 139 bars.
Bar 2: This session closes above the high of Bar 1, validating the failed bearish pullback and confirming that buying pressure has taken control of the lower range.
Bar 3: Buyers accelerate momentum and print a solid close above the 20-period EMA. This continuation bar flashes the first technical signals of a local trend reversal.
Bar 4: Expands the bullish range and directly breaks above the upper boundary of a 36-bar descending channel. This channel represented a two-legged pullback stemming from a bull trap at major resistance around $0.2446 (the last lower high of the macro downtrend). Because the defense of $0.1350 prevented the main downtrend from resuming, bulls initiate a new expansionary cycle targeting the previous trap high at $0.2766.
Pause Phase (Post-Bar 4): Price enters a strict 4-bar compression. Small bodies and two-sided tails demonstrate temporary equilibrium, though buyers successfully defend the low of Bar 4 and the 20 EMA.
Bar 5: Prints as a high-conviction bullish bar. Institutional money enters the market, breaking the prior compression with a higher high and a higher low, though it lacks the necessary fuel to test local resistance at $0.2169.
Bar 6: Bulls attack $0.2169, but bears absorb the demand via profit-taking and aggressive liquidations. This prints a Pinbar candle with a prominent upper tail. Despite the rejection, the high of this bar serves to anchor the upper boundary of the new 21-bar ascending channel.
Bar 7: The market experiences a minor two-bar correction. However, bears show weakness by failing to drag price down to either the 20 EMA or the low of Bar 5.
Bar 8: Volatility returns with a wide-range bearish outside bar that sweeps liquidity. The low tests the 20 EMA and the lower boundary of the ascending channel with surgical precision, trapping sellers and printing a heavy rejection (lower tail) that highlights dense buyer presence in that zone. Bulls retake intraday control and force a close above local resistance at $0.2169.
Bar 9: Acts as a bearish inside bar due to a loss of momentum, as the prior two sessions failed to tag the top of the channel. This triggers a three-bar consolidation process sitting right on top of the moving average.
Bar 10: Sellers attempt to flush through the 20 EMA, but the move gets rejected immediately, leaving a Pinbar candle that closes within the congestion. Its low precisely re-anchors the dynamic support of the 21-bar channel.
Current Bar (Intraday Development): The current session regains its bullish bias by expanding its volatility. It registers tails on both ends and manages to clear the high of Bar 9. The market is now waiting for the next bar to confirm a breakout from the congestion range to resume the rally.
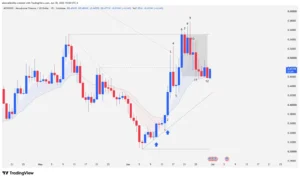
Structural Market Projections
The technical outlook puts JUP in a constructive and asymmetric position. If bulls manage to consolidate the current breakout and clear the critical $0.2766 level, a structural projection triggers an intermediate technical target at $0.4072, paving the way to challenge macro resistance at $0.4543 in the coming weeks. Conversely, a failure at the $0.2766 zone will condemn the asset to wide-range sideways trading, keeping $0.1457 as the definitive floor of the accumulation base.
Disclaimer: This analysis is for strictly informational and educational purposes based on price action methodology. It does not constitute, under any circumstances, investment advice or a financial solicitation. Cryptocurrency markets exhibit extreme volatility; only risk capital you are willing to lose.
Communications Professional. Crypto Enthusiast. Economic Journalist. Bitcoiner & Altcoiner.